

How to Mount Your Pollinator Metal Sign
Your sign was designed to be easy to install, stable in wind, and long-lasting outdoors. Each sign includes two pre-drilled holes. One is centered at the top. One is centered at the bottom. This layout keeps the sign from twisting and gives you several clean, reliable mounting options.
This guide walks you through the most common ways customers mount their 8x12” and 12x18” glossy aluminum signs. Pick the method that fits your space and tools.
For the sake of convenience and at no extra cost to you, this post may include affiliate links. I only support products that I have used myself and recommend. Check out my Affiliate Disclosure here.
Before You Start
1) Choose the right spot
Mount where the message can be read easily. Eye level is usually about 55-65” from the ground. In garden beds, keeping the bottom edge 8-12” above soil prevents plants from blocking the design.
2) Protect the glossy finish
Lay the sign face-down on a towel while you work. If you want extra protection and less vibration, place a thin rubber washer between the sign and the surface.
3) Know your screw heads
Here is the fast cheat sheet:
Hex head (6-sided): strongest grip, best for outdoor installs
Torx (star-shaped): excellent control, very hard to strip
Phillips (#2): common and easy, but can slip in hard materials
If you are unsure of hole size, choose screws or bolts slightly smaller than the hole so they slide through easily. Most installs use 3–5 mm hardware with flat washers.
Option 1: Mount to Wood
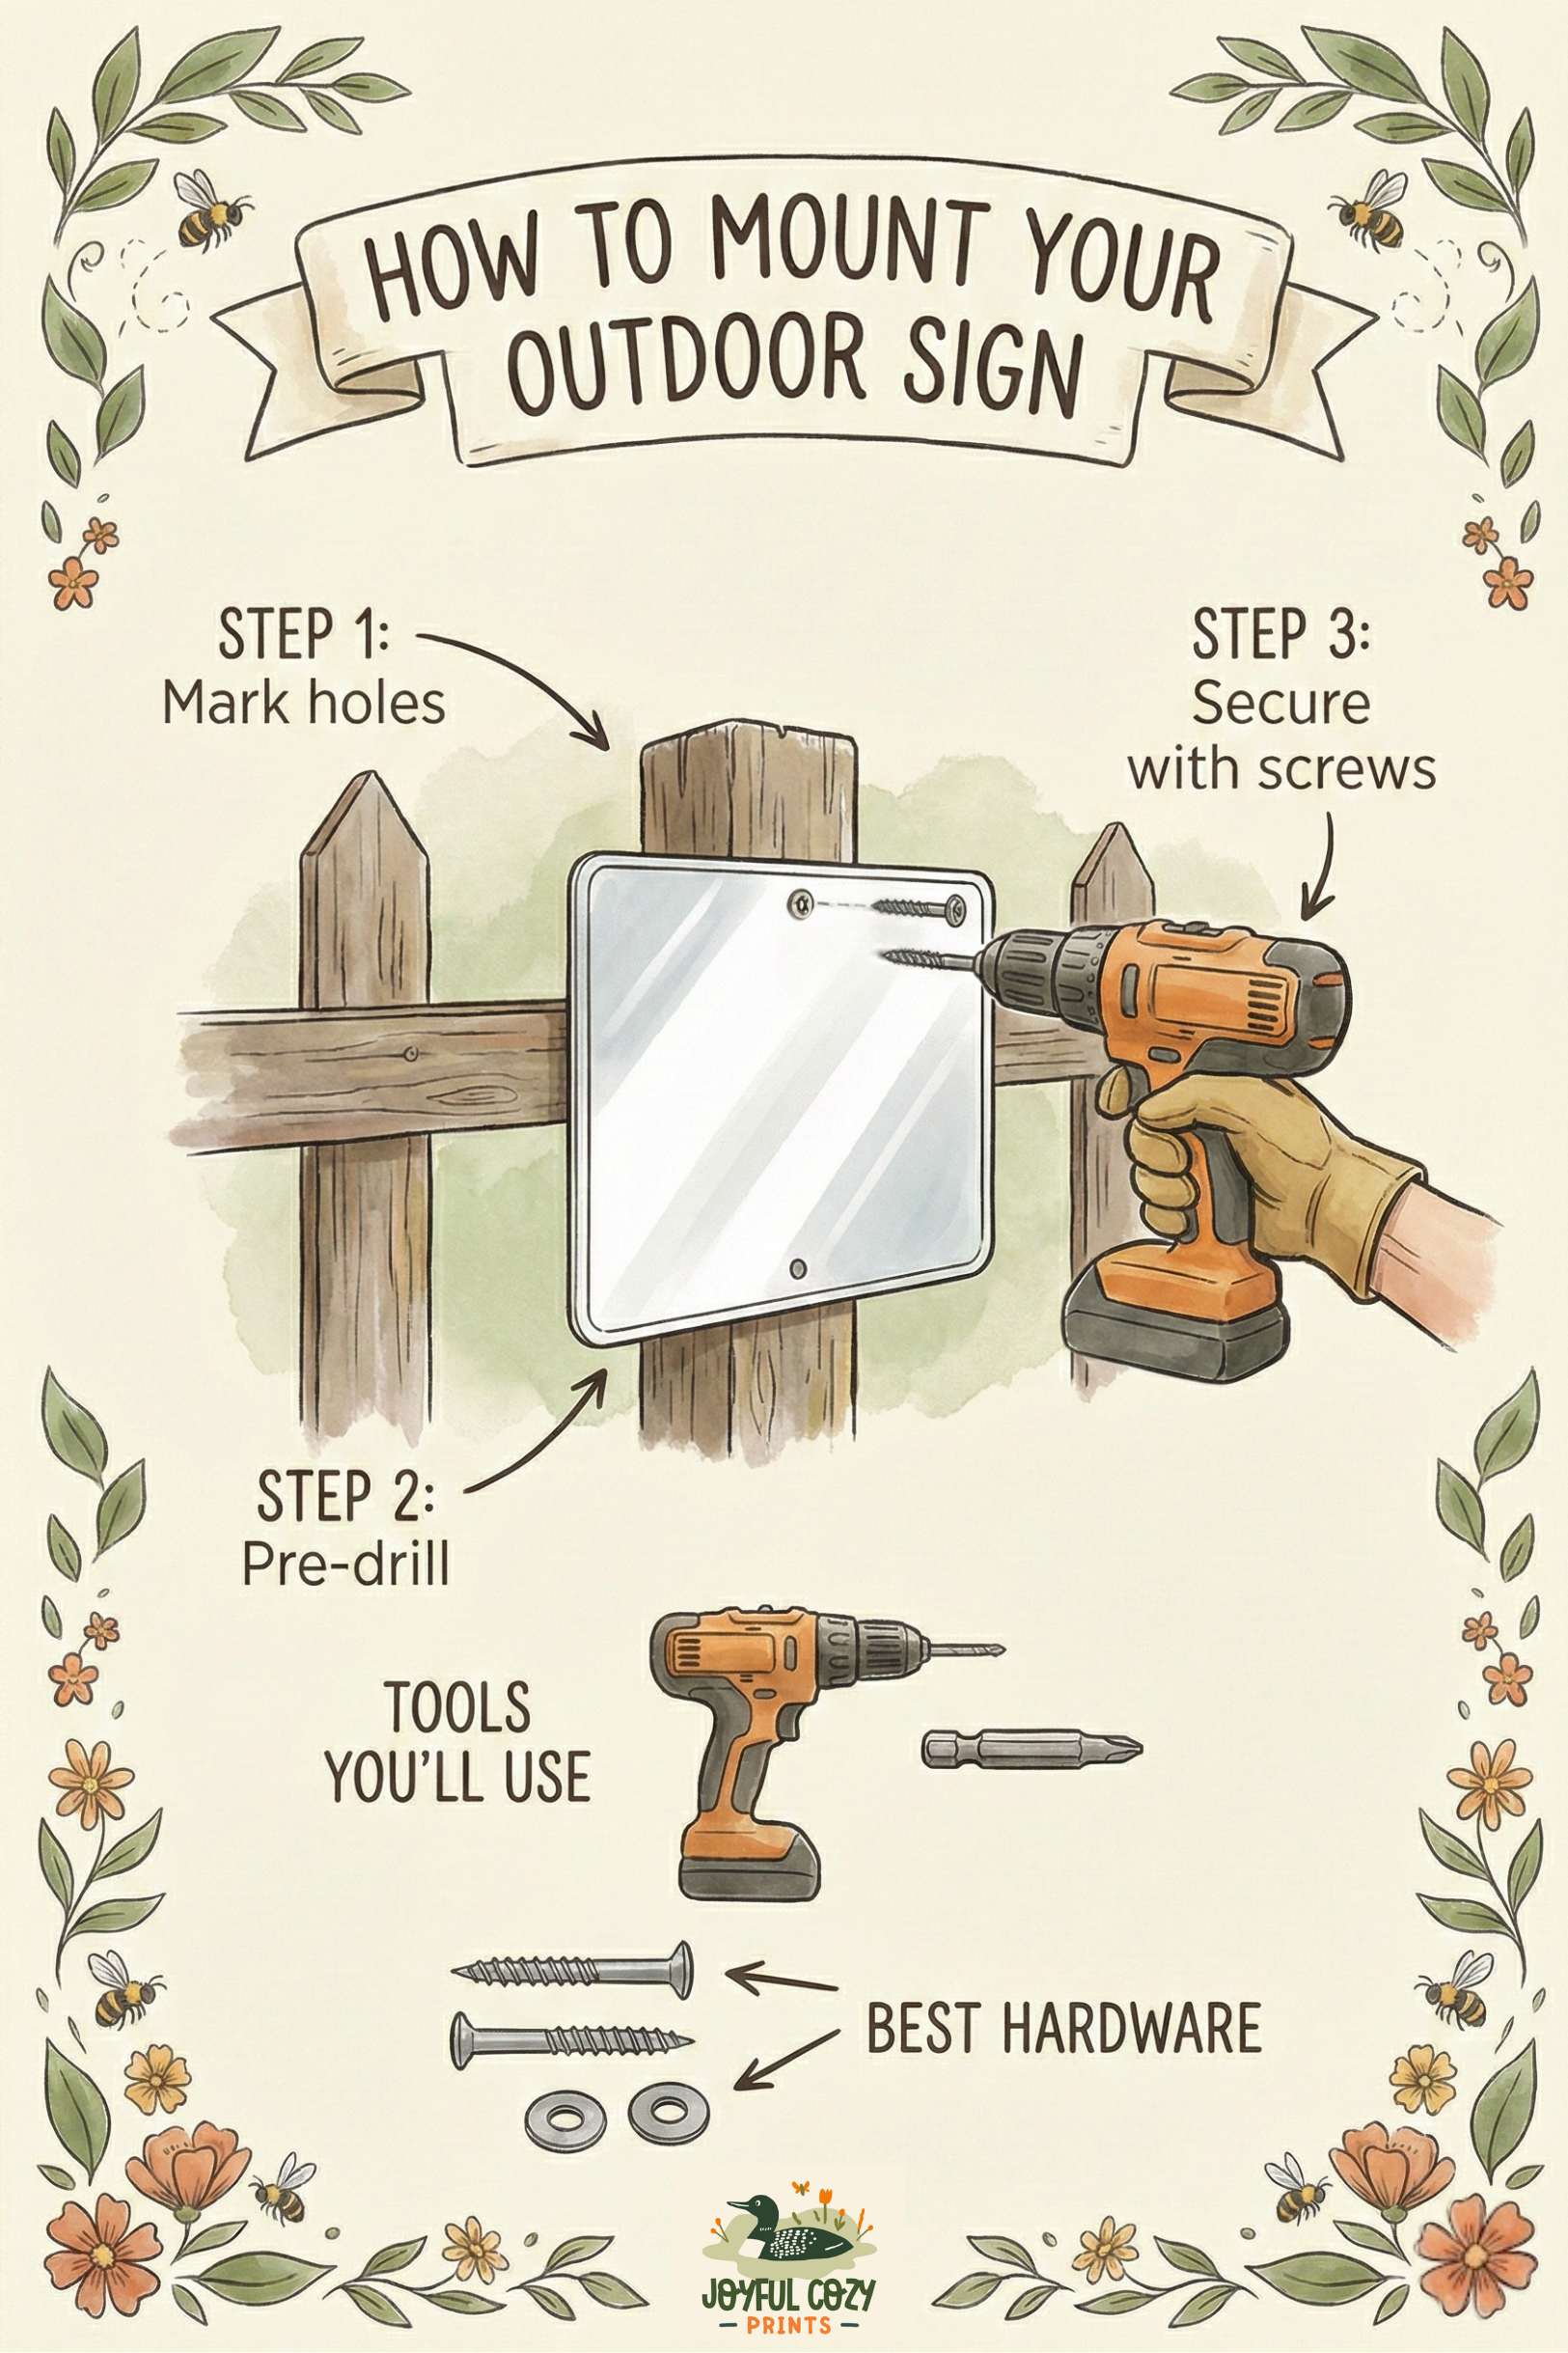
Best for fences, posts, sheds, raised beds, and garden structures.
What you’ll need
Screws: Exterior stainless steel or coated wood screws
Head type: Hex head (best) or Torx
Length: 25–40 mm
Washers: Flat washers, optional rubber washers
Tools you’ll use
Drill or impact driver
Hex driver bit or socket (8–10 mm is common)
Small wood drill bit for pilot holes
Steps
Hold the sign in place and mark the top hole.
Pre-drill a small pilot hole.
Add a washer and drive the top screw until snug.
Level the sign.
Mark and pre-drill the bottom hole.
Add washer and screw. Tighten both.
Hardware note
If you want everything in one place, a small outdoor sign hardware kit with stainless screws and washers makes this quick and tidy. I keep one linked below.
Option 2: Brick, Concrete, or Stone
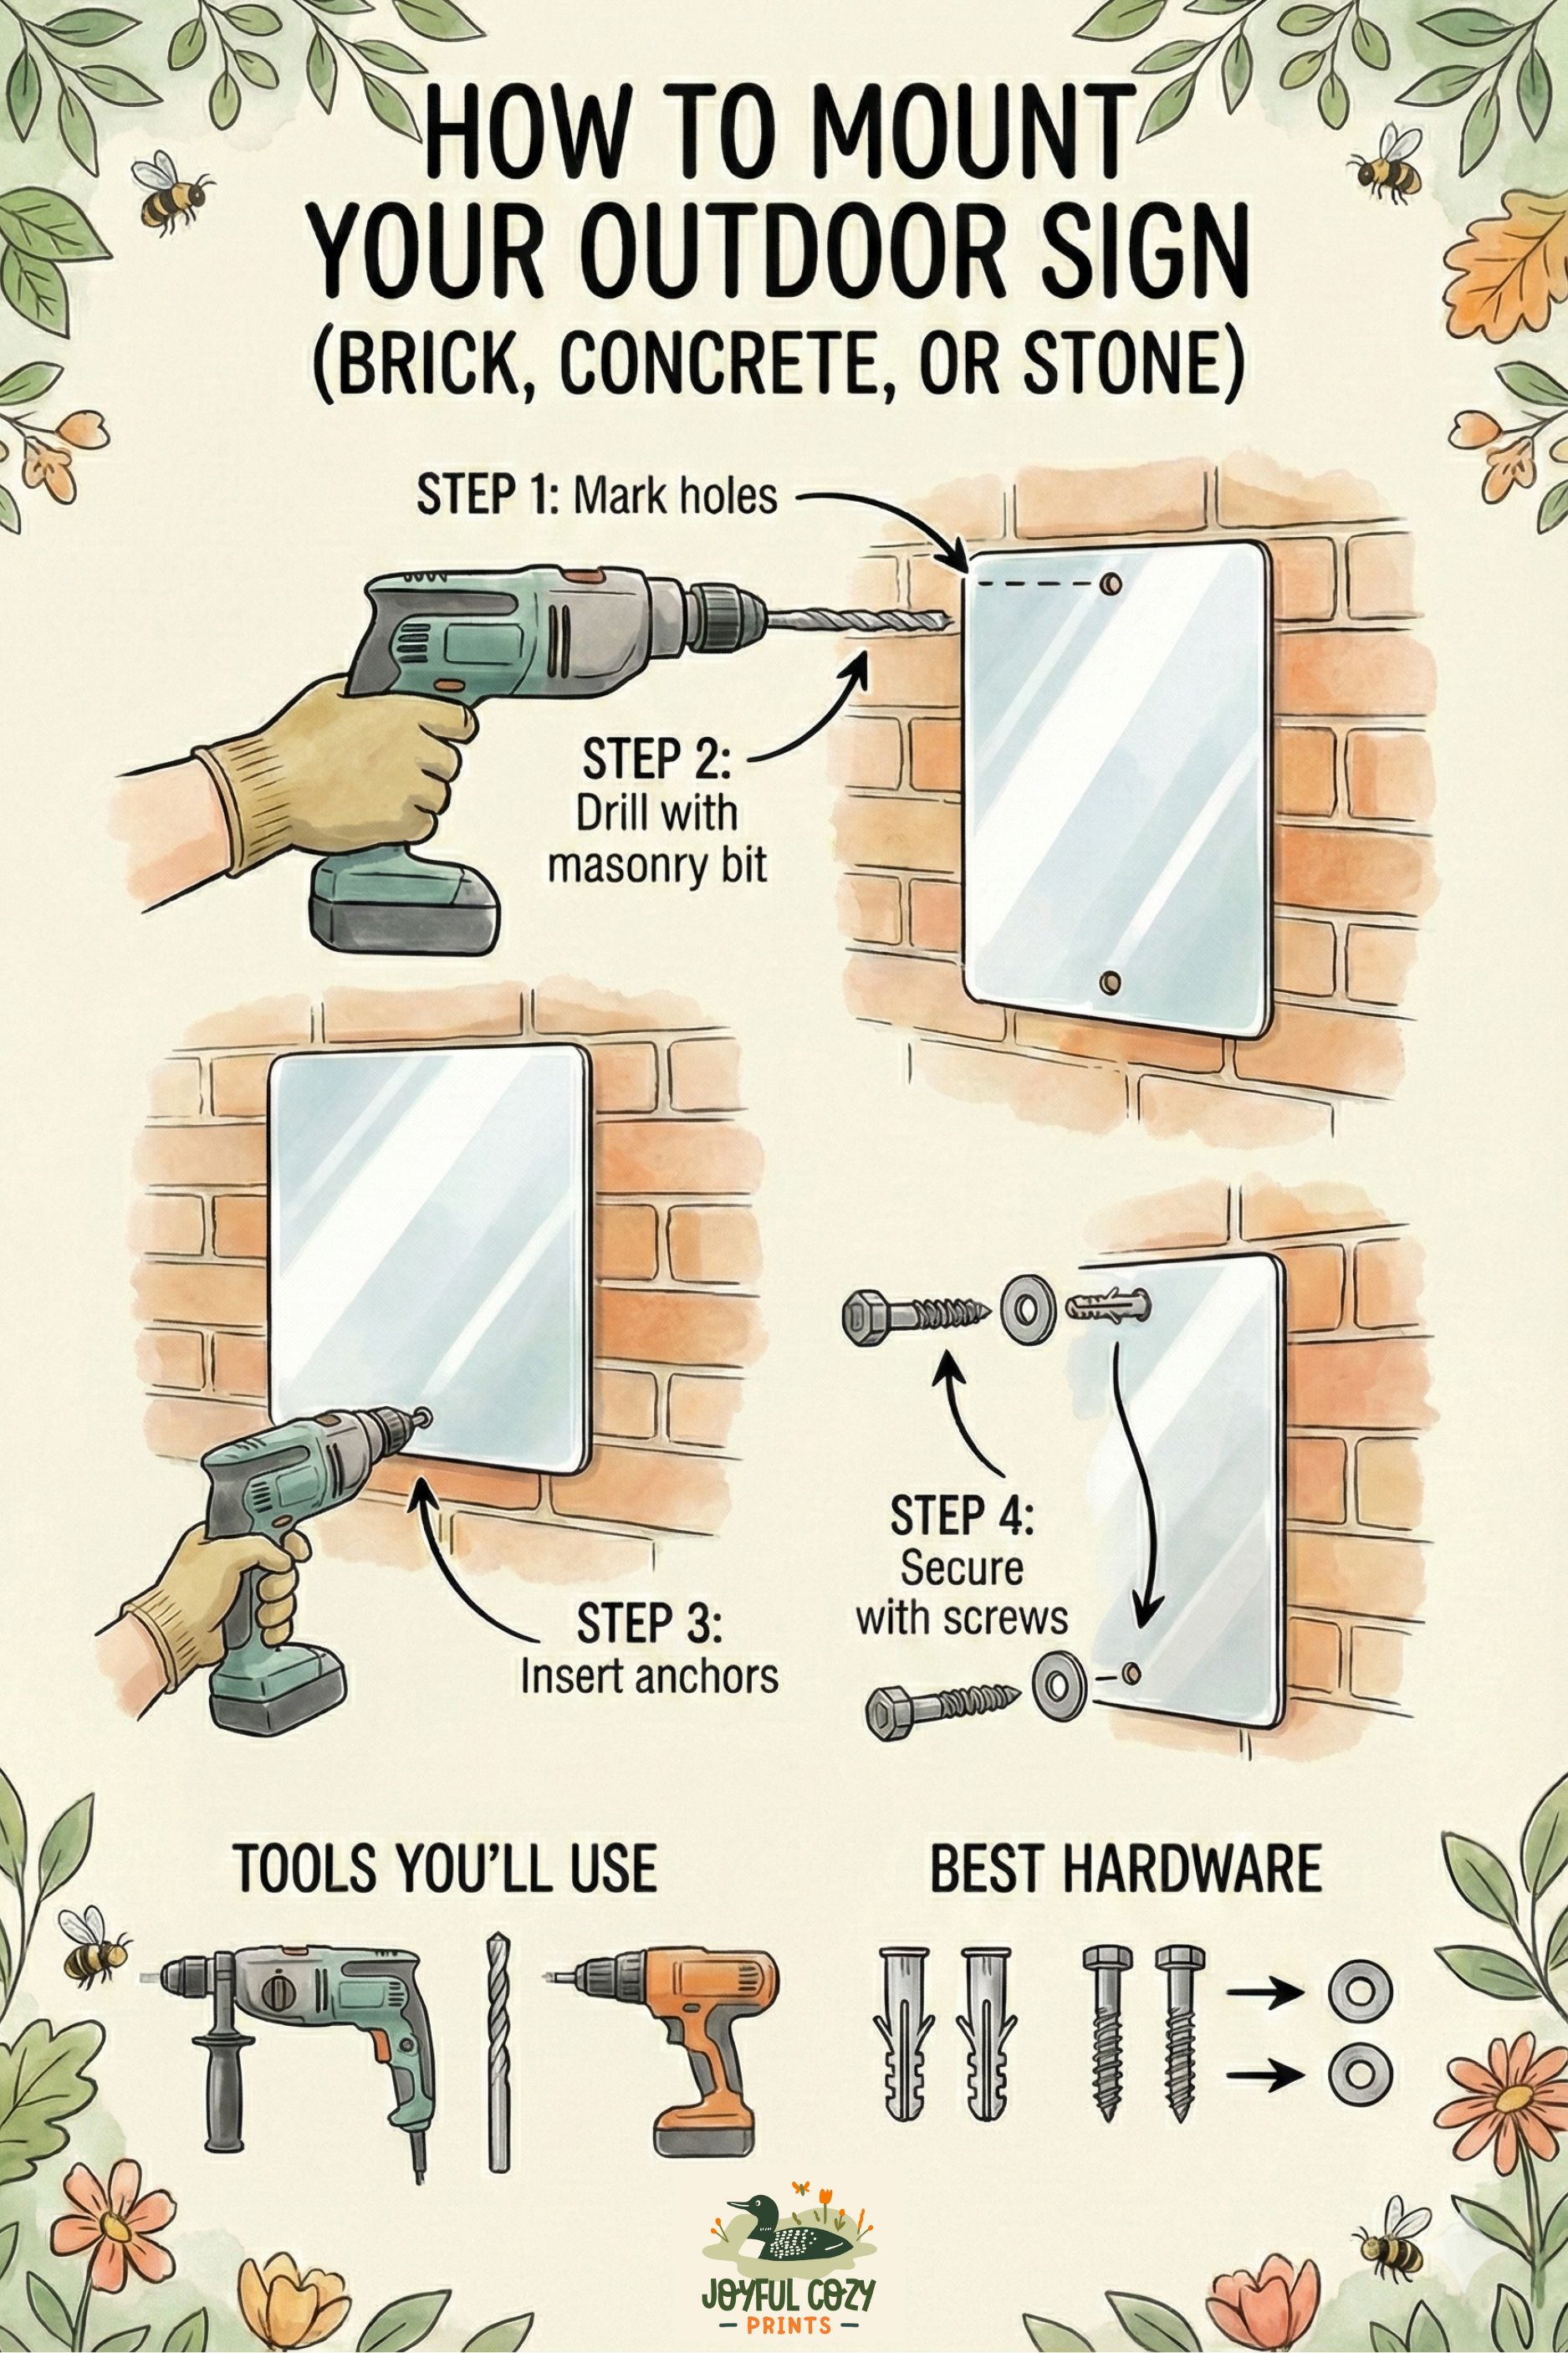
Ideal for house walls, garages, garden walls, and hardscapes.
What you’ll need
Anchors: Masonry anchors sized to your screws
Screws: Stainless or coated
Head type: Hex or Torx
Washers: Flat washers
Tools you’ll use
Hammer drill
Masonry drill bit that matches your anchors
Hex driver or socket for tightening
Steps
Hold the sign in place and mark both holes.
Drill into the masonry to anchor depth.
Insert anchors until flush.
Add washers and secure the top screw first.
Install the bottom screw and tighten gently.
Hardware note
A basic masonry kit that includes anchors, stainless screws, and washers saves time if you do not already have these pieces.
Option 3: Vinyl Siding or Exterior Walls
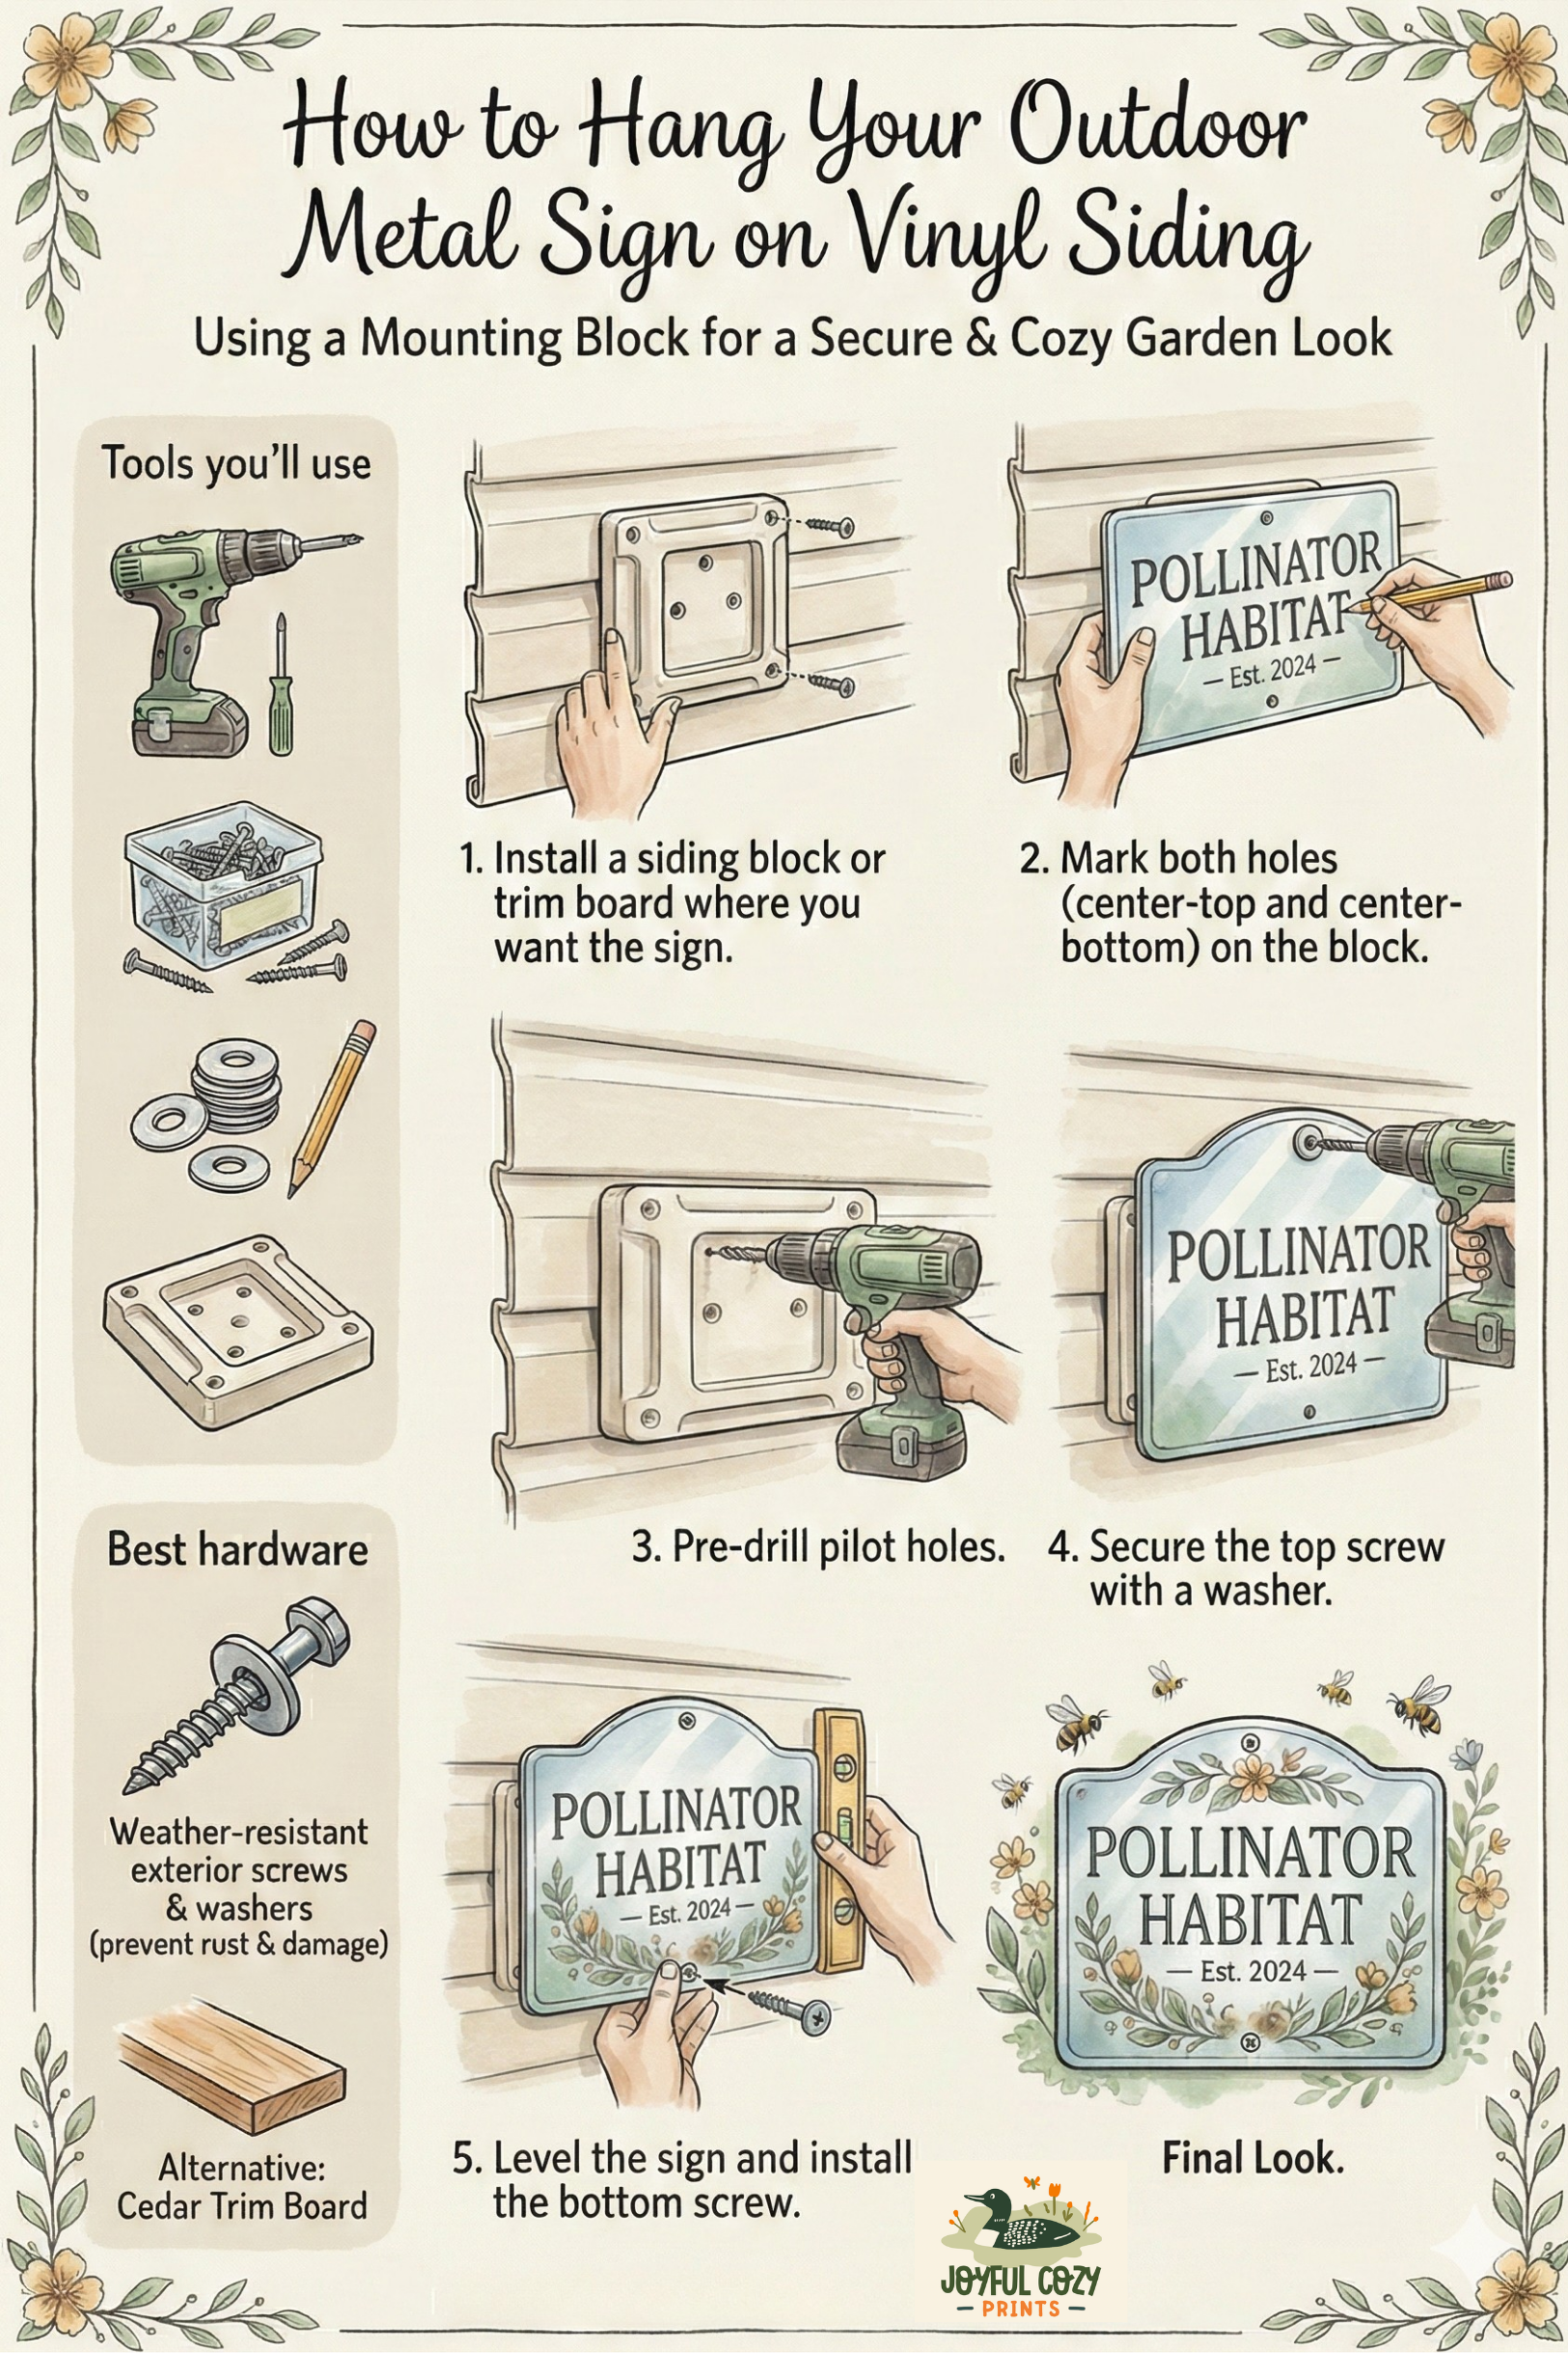
Vinyl siding needs a solid backing so the sign stays flat and not warp.
What you’ll need
Mounting block or trim board behind the siding
Screws: Exterior-rated
Head type: Hex or Phillips
Washers
Tools you’ll use
Drill or impact driver
Phillips #2 bit or hex driver
Wood drill bit for pilot holes in the block
Steps
Install a siding block or trim board where you want the sign.
Mark both holes on the block.
Pre-drill pilot holes.
Secure the top screw with a washer.
Level the sign and install the bottom screw.
Hardware note
A small exterior mounting kit with coated or stainless screws works well here. Avoid fastening only into unsupported vinyl panels.
Option 4: Metal (Gate, Pole, Railing)
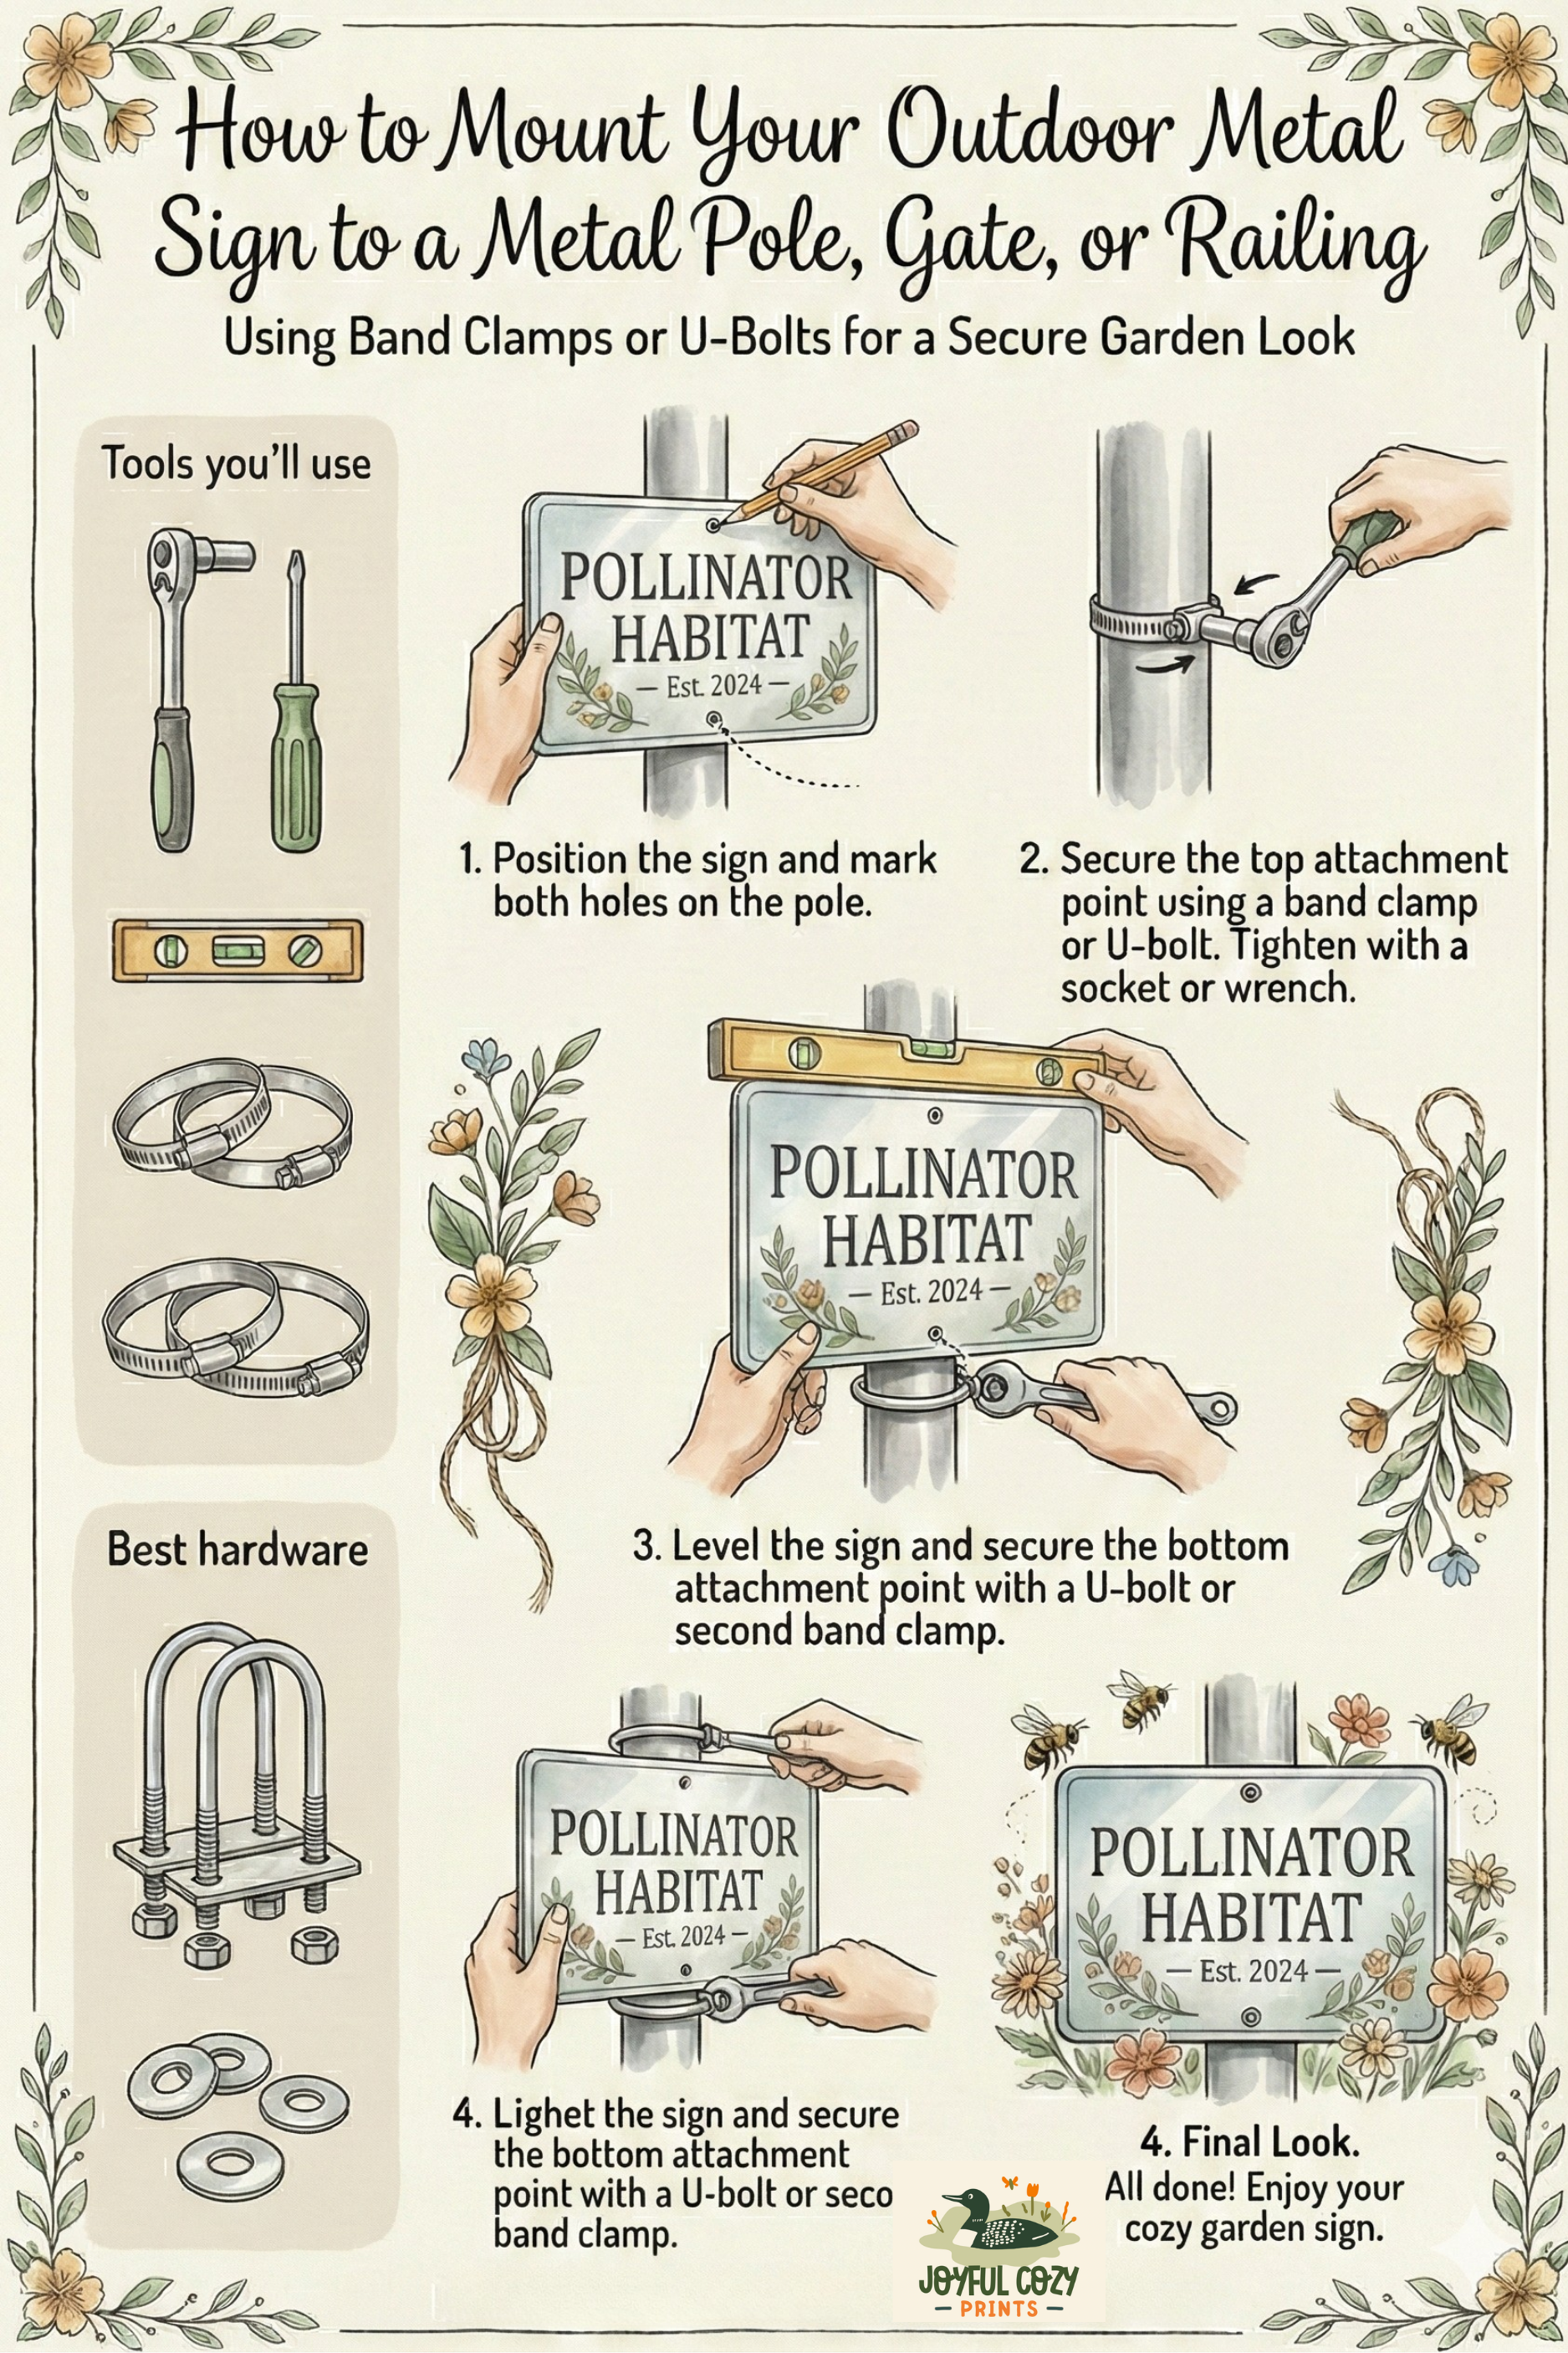
No-Drill Method for Poles
Drill Method
What you’ll need
Screws: Self-tapping metal screws
Head type: Torx or Hex
Washers
Tools you’ll use
Metal drill bits
Torx or hex driver bit
Impact driver for harder steel
Steps
Mark both holes.
Drill pilot holes if your screws require it.
Secure the top first, then the bottom.
No-Drill Method for Poles
What you’ll need
Two U-bolts or stainless band clamps sized to your post
Tools you’ll use
Socket set or wrench (10–13 mm common)
Steps
Place the sign against the pole.
Wrap the clamp or U-bolt through the top hole and around the post.
Repeat at the bottom hole.
Tighten evenly.
Hardware note
Stainless band clamps are a clean, weather-safe option. Many outdoor hardware kits include them.
Option 5: Hang from a Hook or Bracket
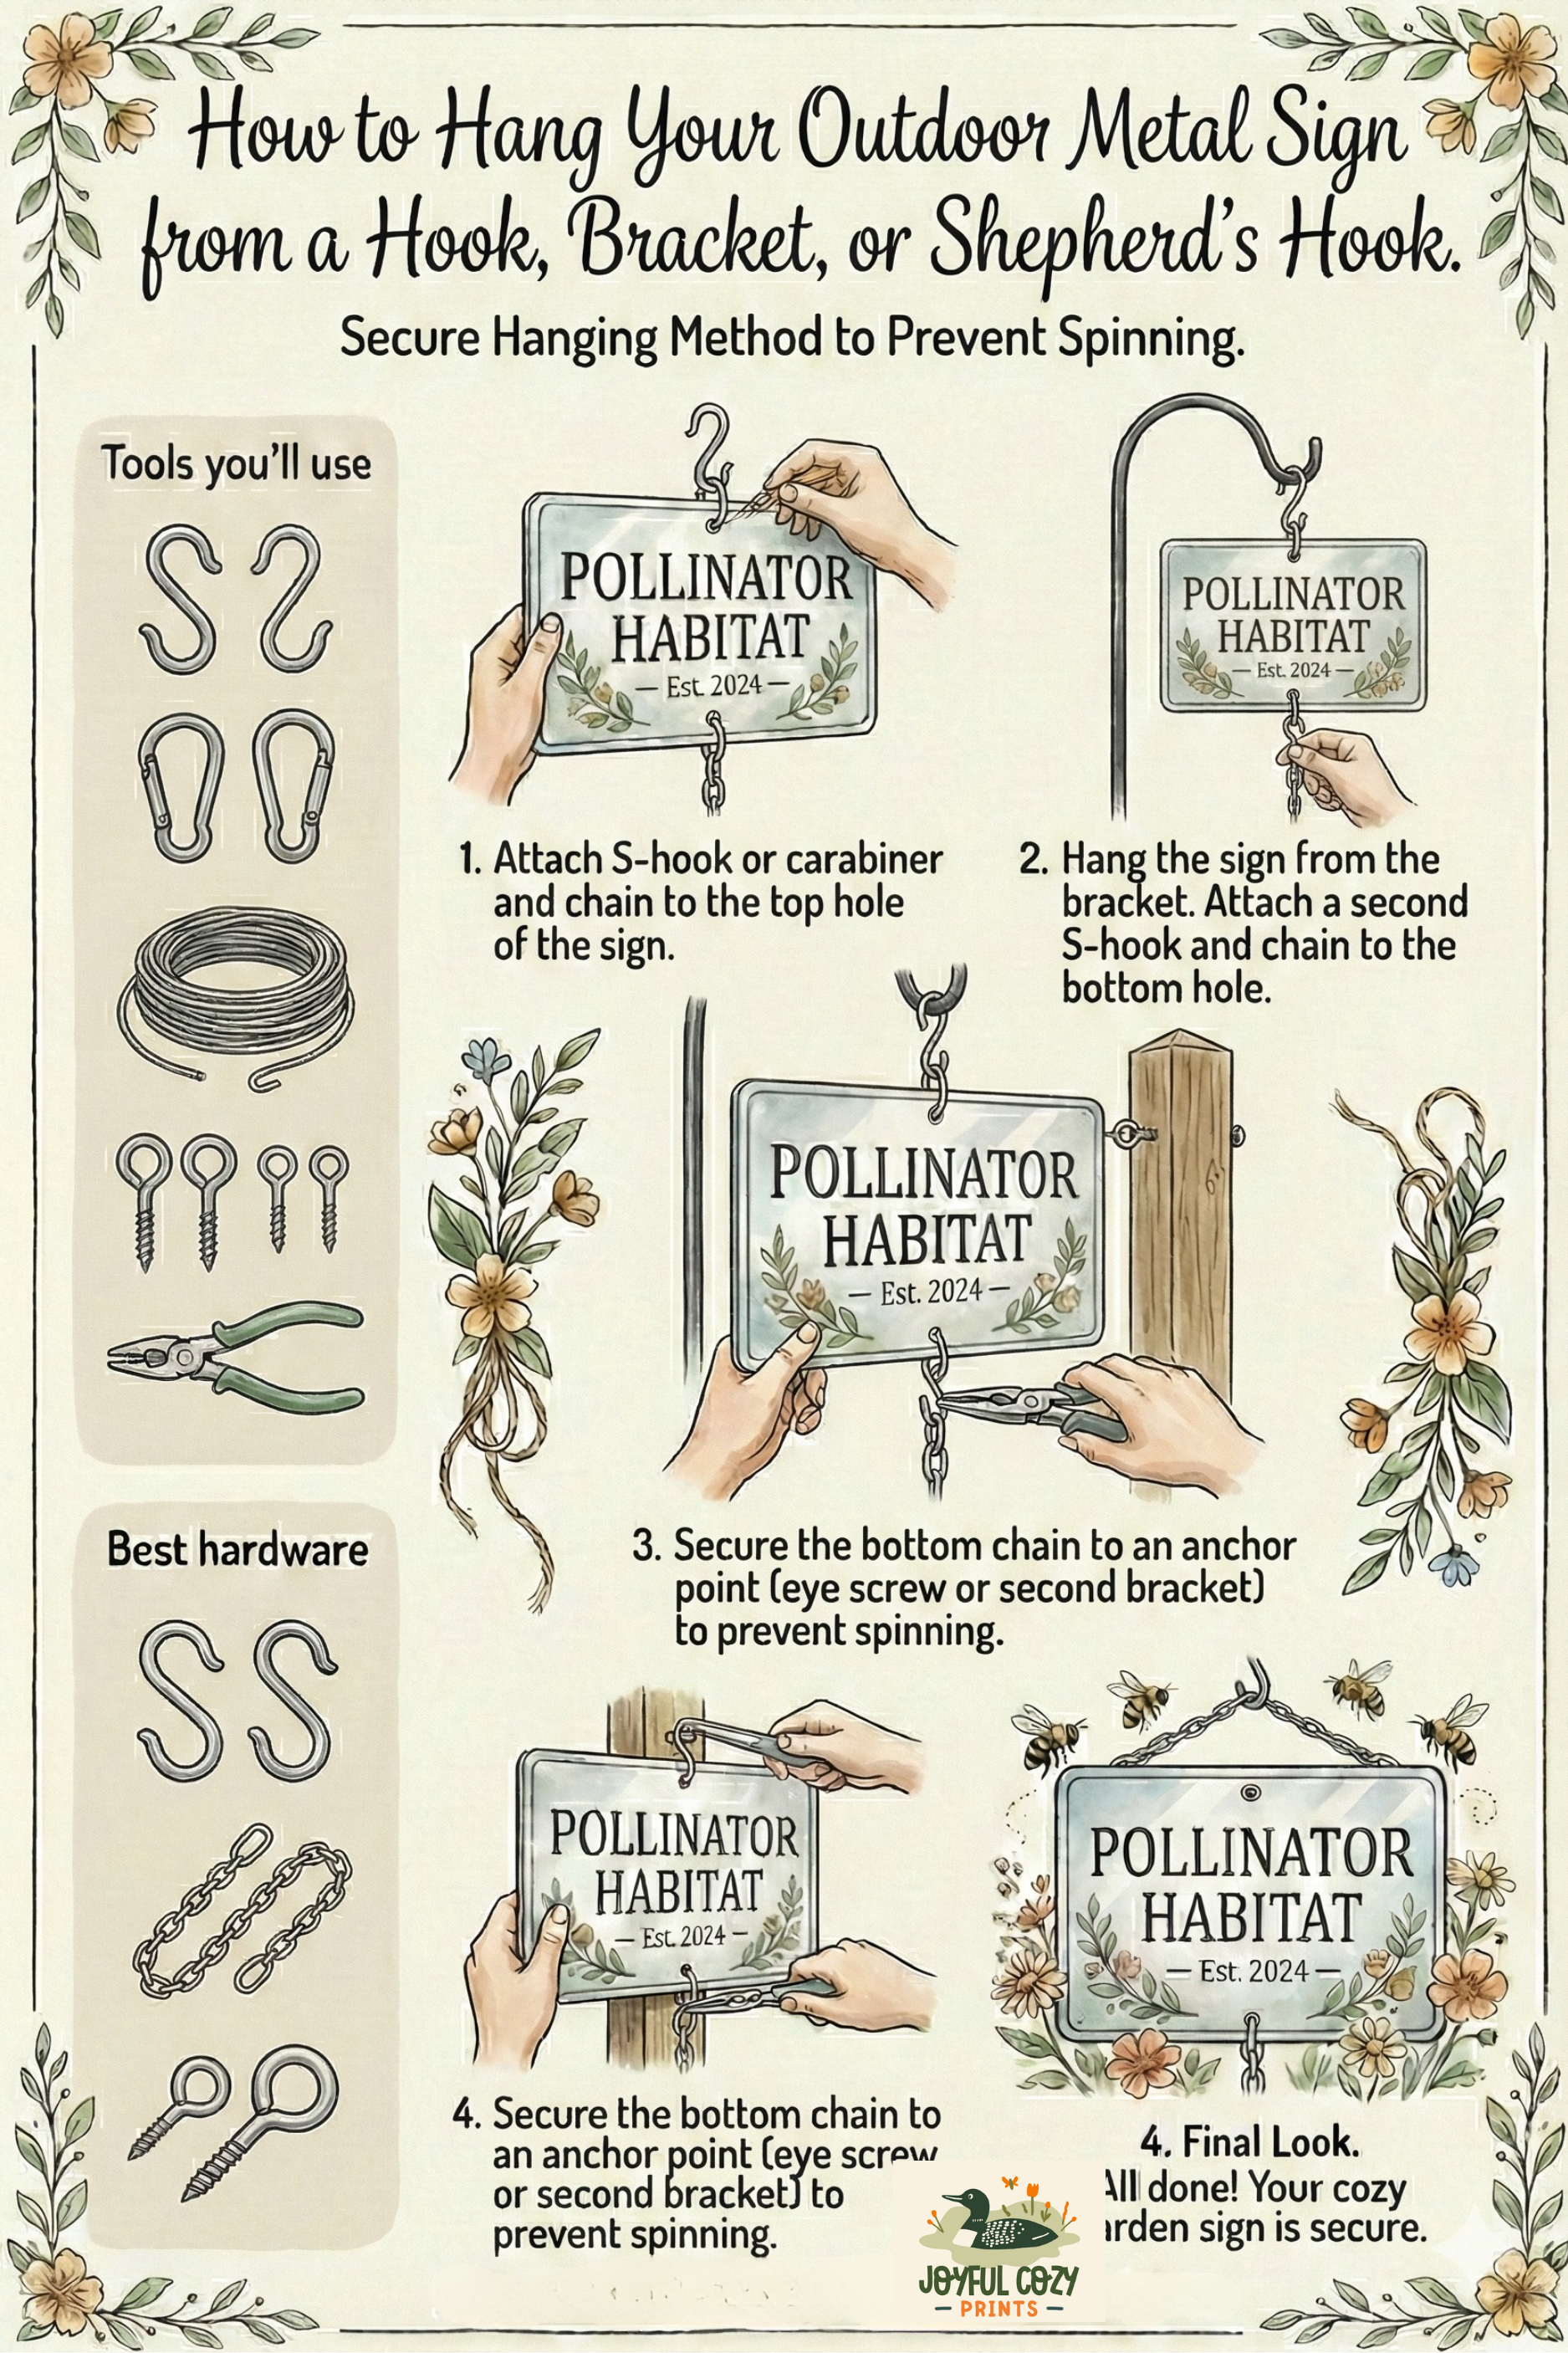
Perfect for porches, pergolas, shepherd hooks, and garden brackets.
What you’ll need
S-hooks or small carabiners
Outdoor-rated chain or coated wire
Optional eye screws for wood
Tools you’ll use
Drill
Phillips #2 or hex driver
Pliers for wire
Steps
Hang the top hole from your hook or bracket.
To prevent spinning, secure the bottom hole to a second hook or anchor point.
Adjust until the sign sits flat.
Hardware note
A hanging kit with S-hooks, coated wire, and small anchors keeps everything neat and secure.
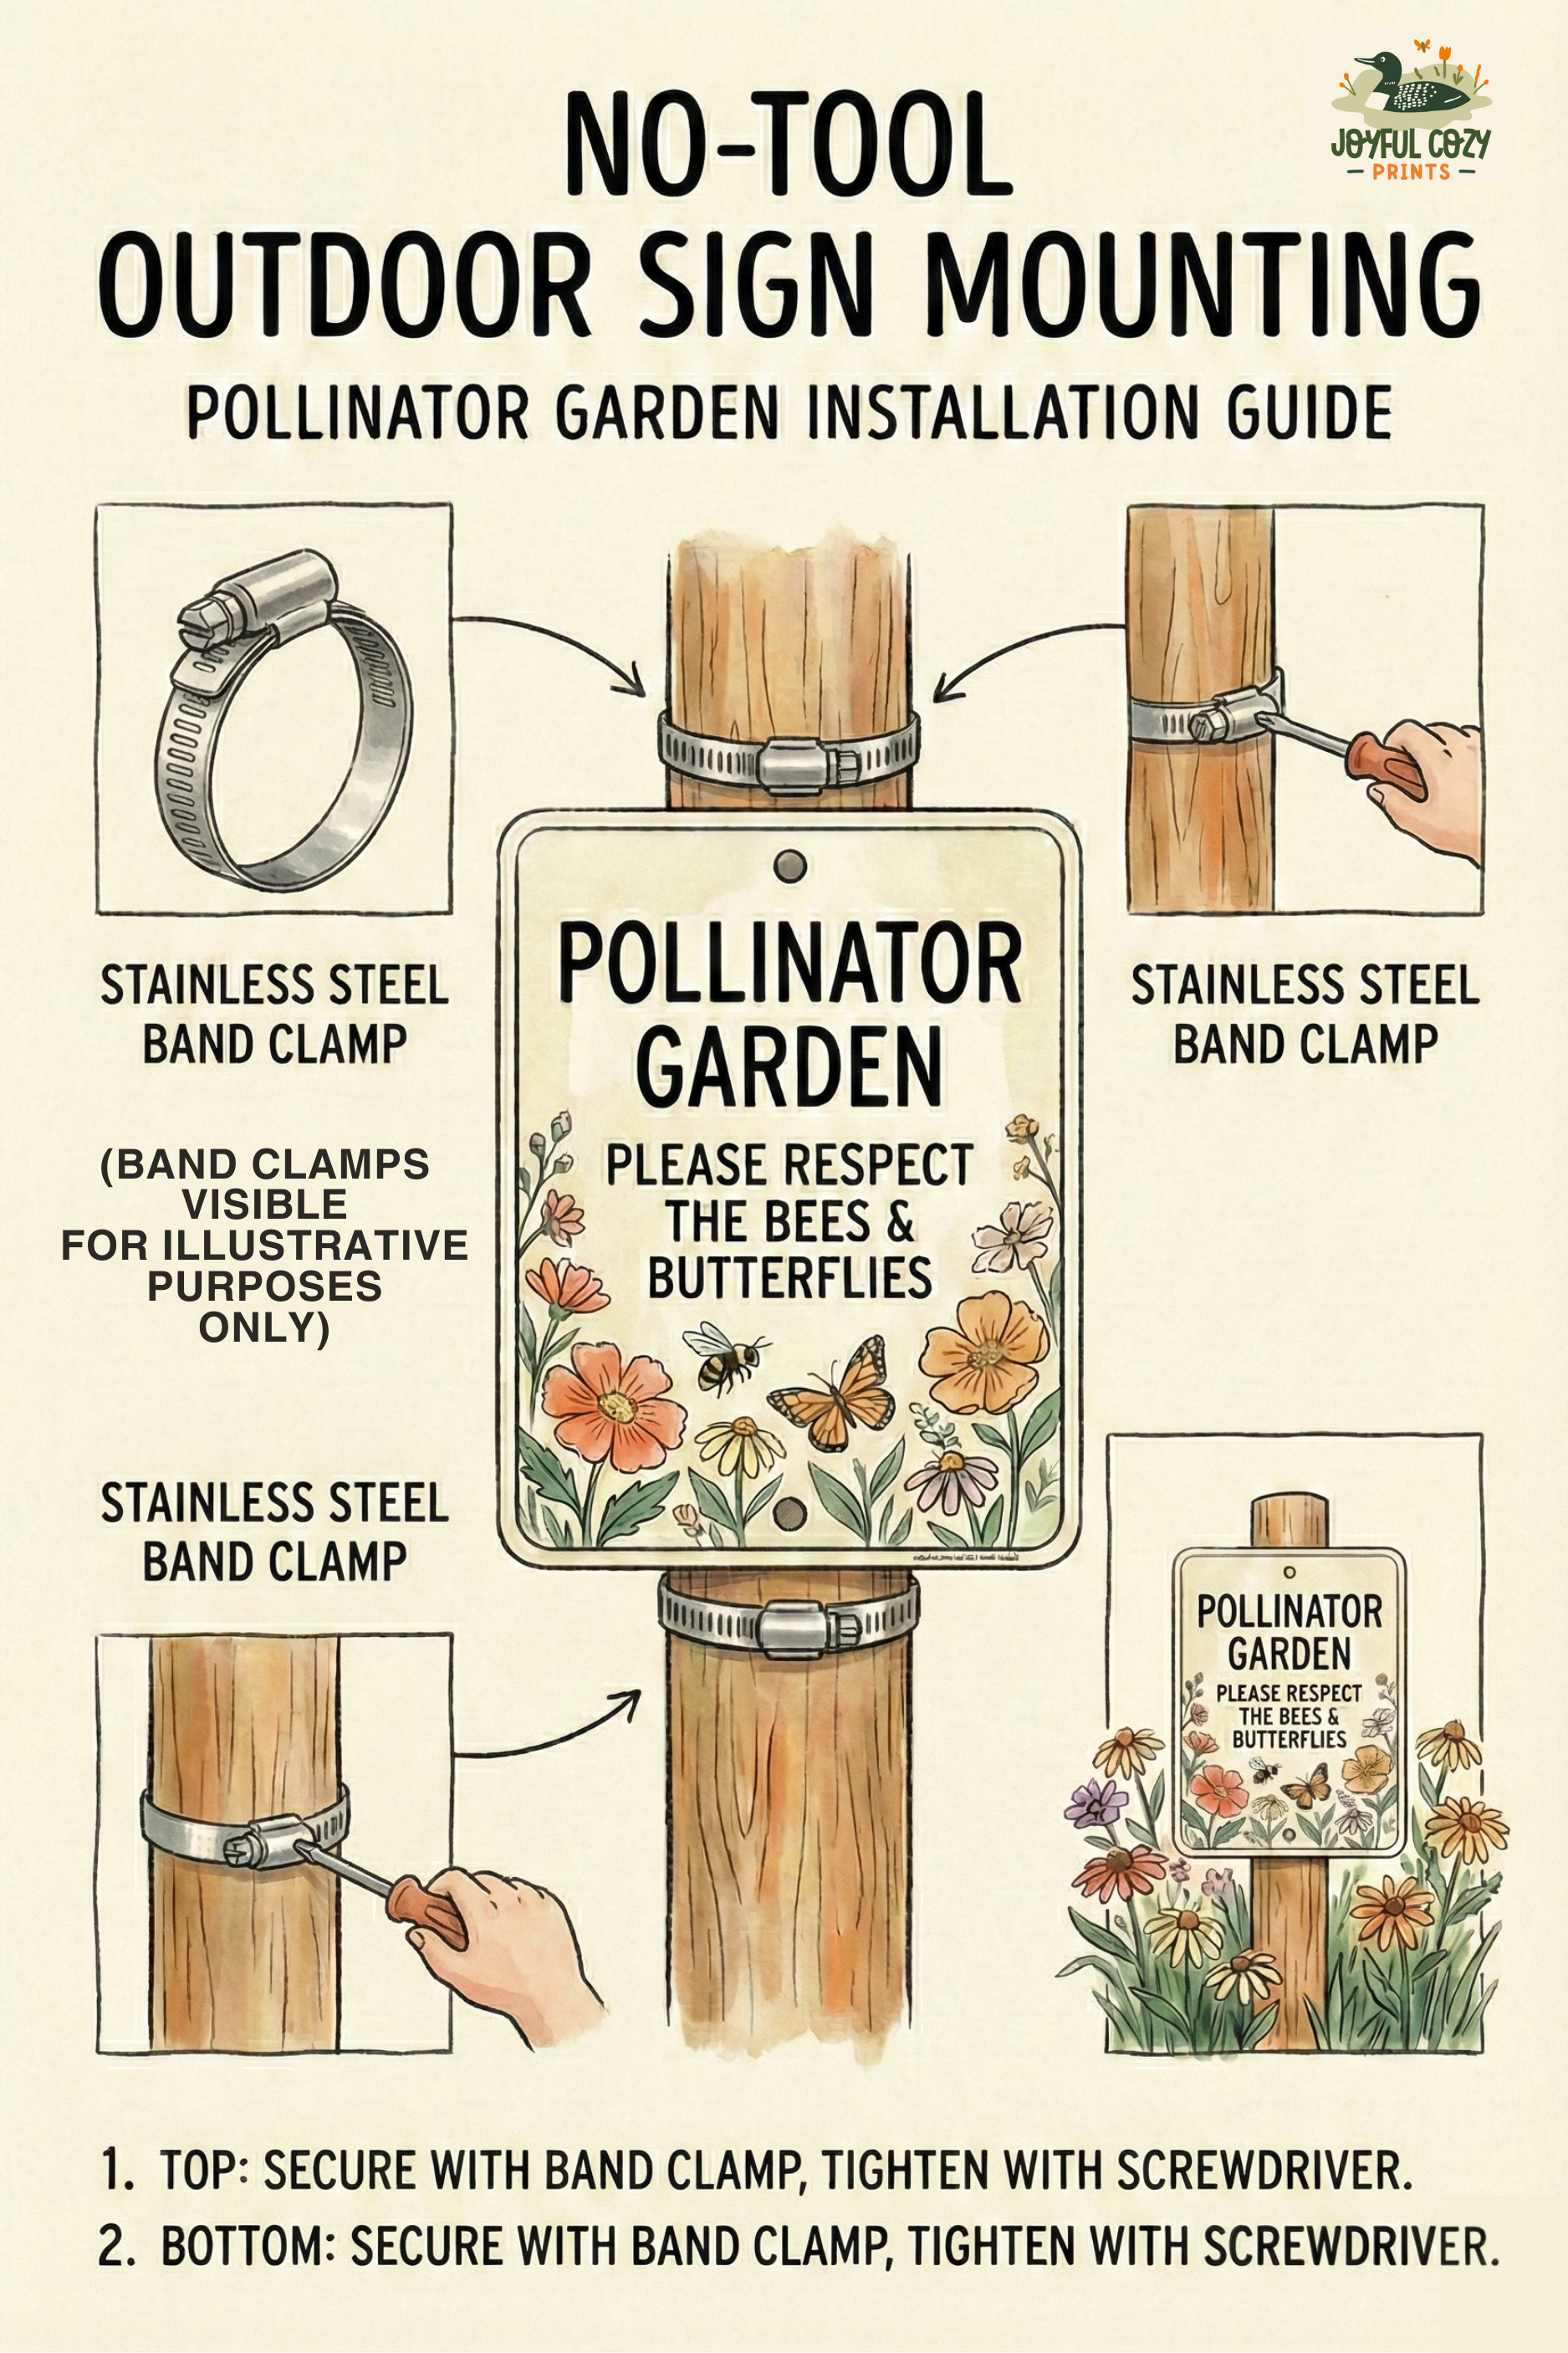
Option 6: Tool-Free Mounting
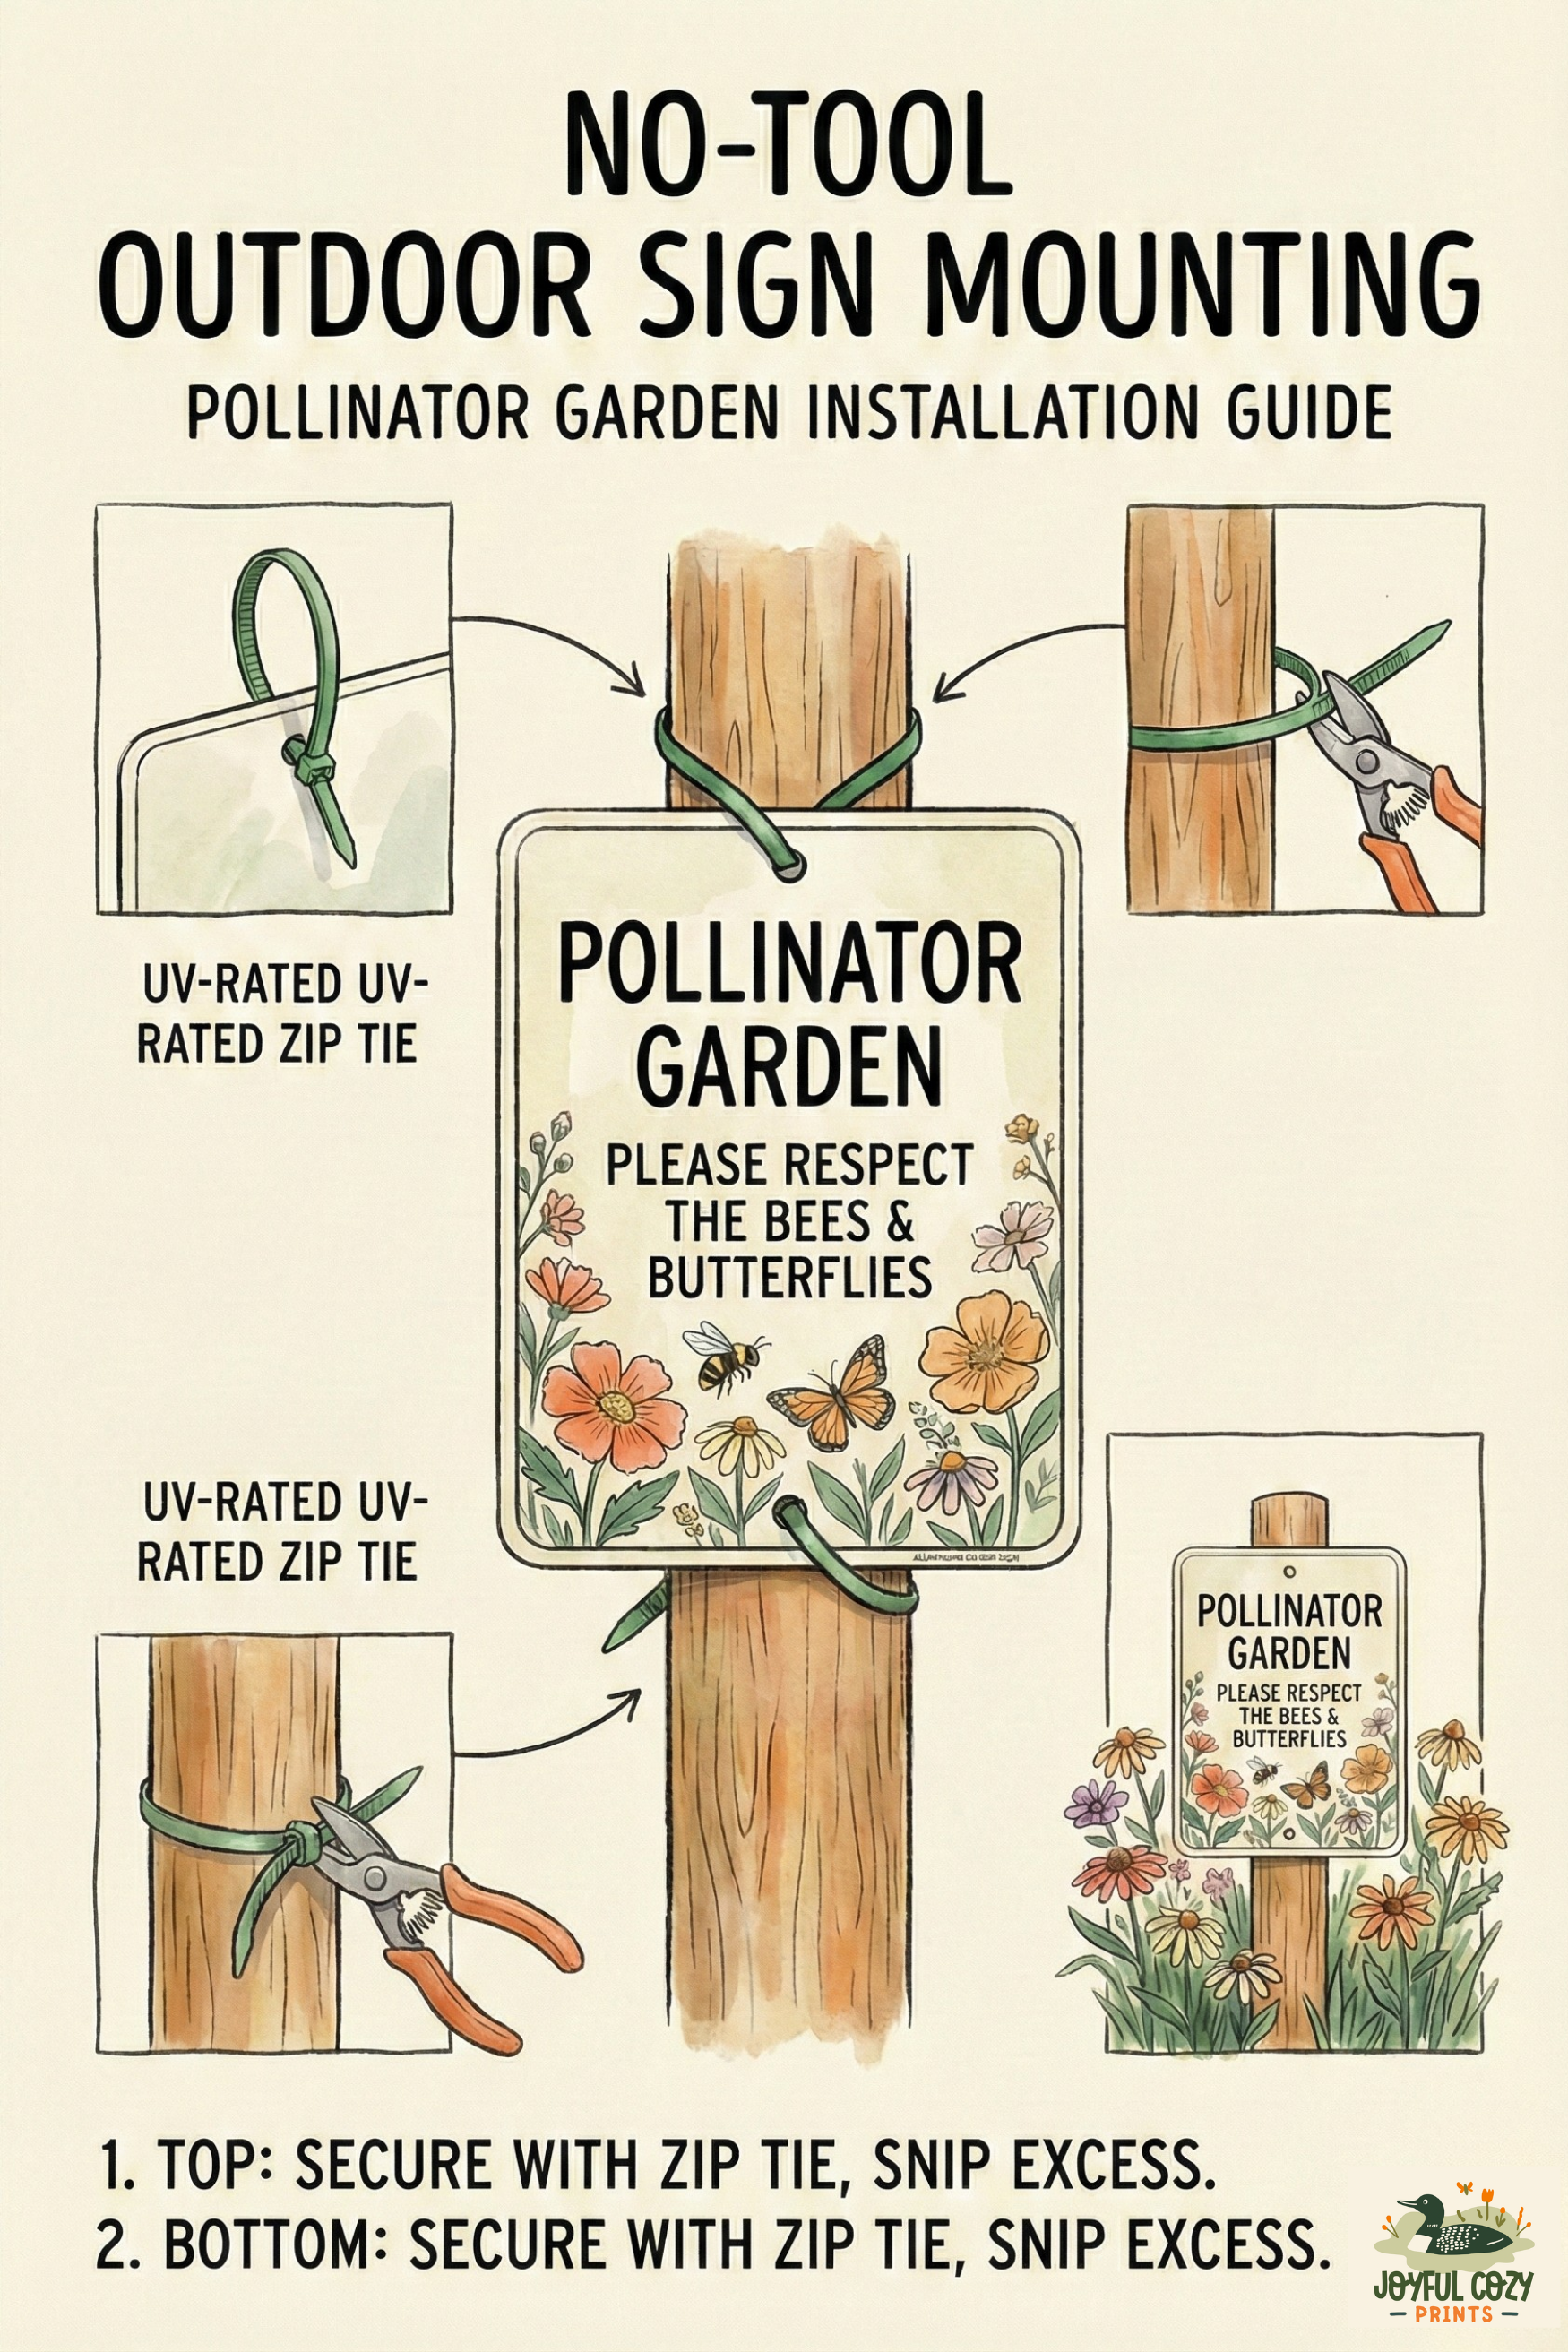
Great for temporary installs, rentals, or when you do not want to drill.
Zip Ties
Use UV-rated outdoor ties only.
Tools
Cutters to trim ends
Steps
Thread a tie through the top hole and around the post or rail.
Repeat for the bottom hole.
Pull tight and trim excess.
Band Clamps
Stronger and longer-lasting than zip ties.
Tools
Screwdriver or socket
Steps
Feed the clamp through the top hole and around the post.
Tighten until snug.
Repeat at the bottom.
Hardware note
Outdoor clamp or tie kits are inexpensive and useful for many garden projects.
Option 7: Freestanding Garden Stake
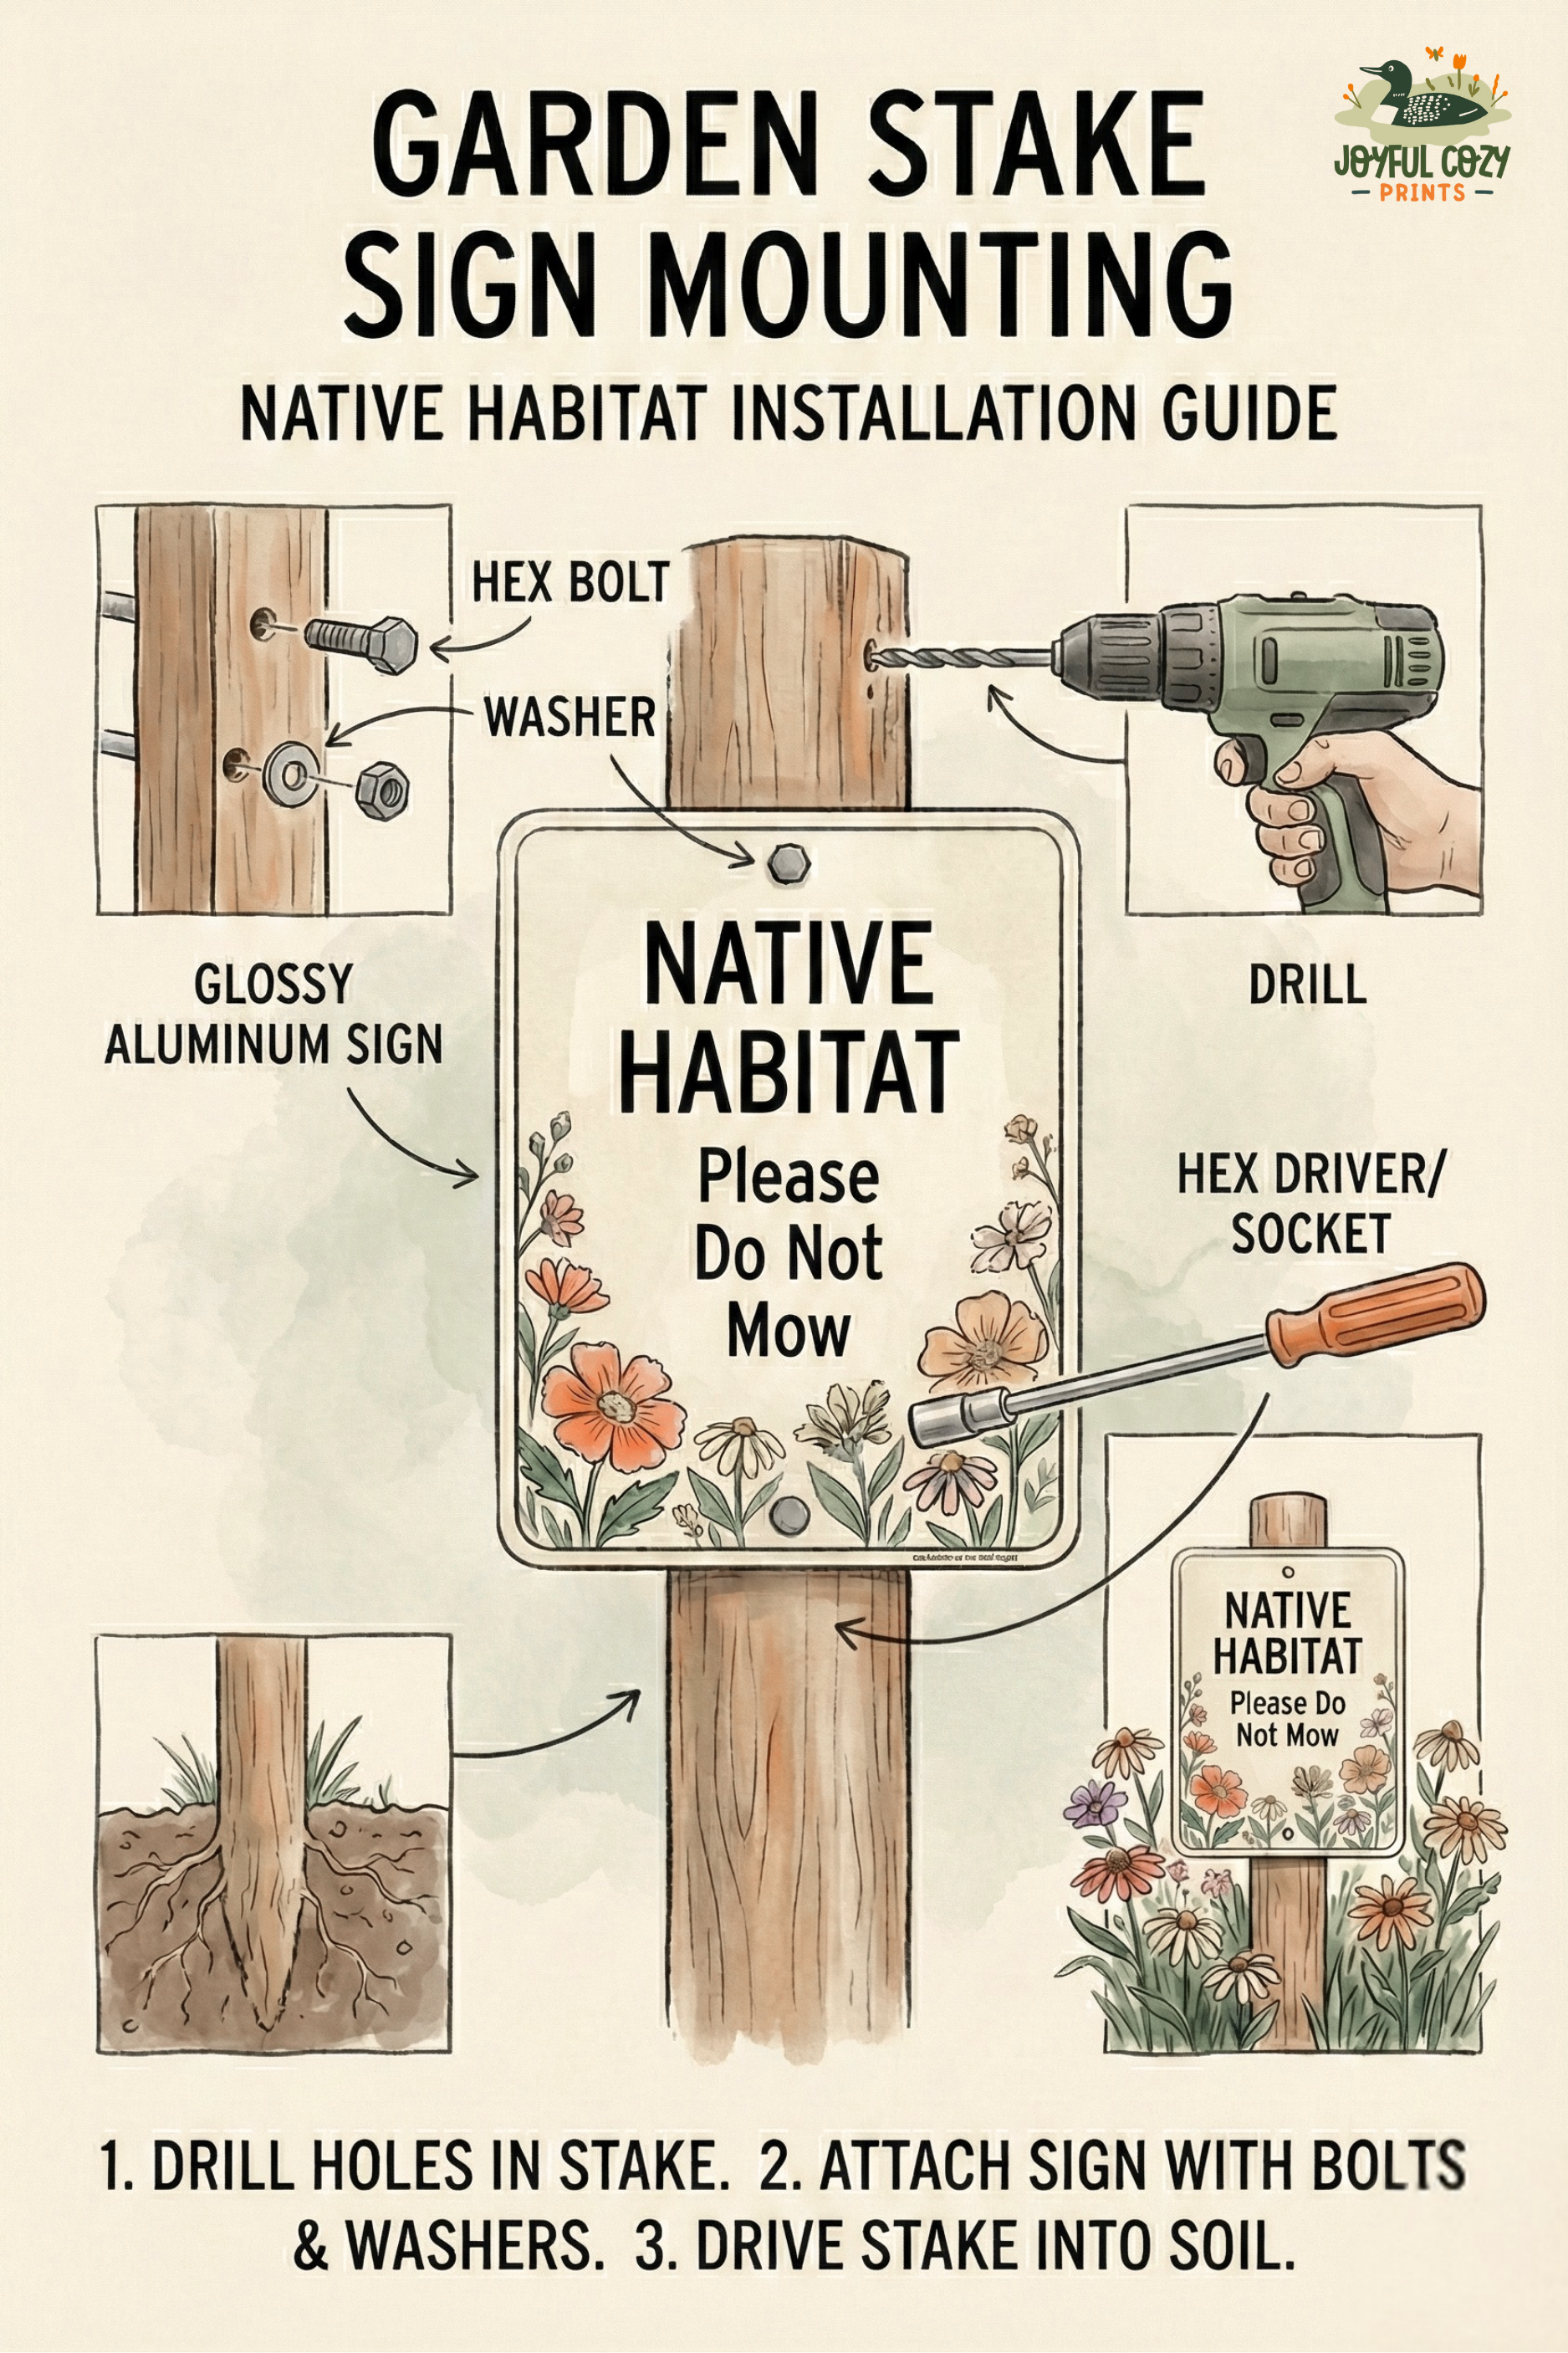
Best when you want the sign in a bed, near a path, or at the edge of a pollinator garden.
This is the preferred method by Joyful Cozy Prints.
What you’ll need
A sturdy stake, 36-60” tall
Two screws or bolts with washers
Hex or Torx for best grip
Optional: bracket or crossbar
Tools you’ll use
Drill
Hex driver or socket
Steps
Drive the stake at least 8-12” into the ground.
Hold the sign at your desired height.
Attach the top hole first.
Secure the bottom hole.
If needed, add a small bracket behind the sign for extra stability.
Hardware note
A small stake-mount kit with brackets and stainless hardware makes this quick and clean.
Choosing the Right Hardware Size
If you want to measure at home, use a ruler or caliper to check the hole diameter.
If you prefer a safe default, most installs use:
3–5 mm screws or bolts
Flat washers that fully cover the hole without overlapping the design
Always choose hardware slightly smaller than the hole so it fits easily.
Care Tips for Long-Term Display
Use stainless steel or coated hardware to avoid rust marks.
Add rubber washers if you notice vibration in wind.
Clean occasionally with mild soap and water. Avoid abrasives on the glossy surface.
If you move the sign seasonally, store your hardware together in a labeled bag.
About the Hardware Kits I Recommend
If you prefer not to hunt for individual parts, I keep a short list of outdoor mounting kits that include the most useful pieces: stainless screws, washers, masonry anchors, band clamps, and hanging hardware. These are not required, but they make installation faster if you do not already have supplies.
My go-to outdoor sign mounting kit:
[ Amazon - Hex Bolts and Nuts Assortment Kit With Case ]
Helpful add-ons for specific installs:
Masonry anchor kit: for brick, concrete, and stone
Stainless band clamps: for poles and railings
UV-rated zip ties: for tool-free installs
S-hook and chain set: for hanging displays
I only suggest tools I would use on my own signs. You can always source locally if that is easier for you.
Your sign was created to be flexible, sturdy, and simple to display. Whether it ends up on a fence, a garden stake, or a brick wall, I hope it brings visibility to the small choices that make a big difference for native habitats and pollinators.